![[icube banner]](../images/icube1.jpg)
The DLMS communication survival kit
This page shortly describes the basic concepts of the DLMS/COSEM model and protocols. It is certainly very incomplete and somewhat over simplified. Still, the presented information and the practical examples should give the minimal necessary knowledge needed to be able to read metering data from a compliant device. It is needless to say that the definitive reference about the COSEM/DLMS model and protocols remains the ''colored books'' (Green Book, Blue Book) of the DLMS User Association.
The Problem
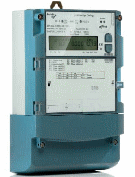
We want to write a program able to read the value of the active energy register of an electricity-meter of this kind...
|
...using a serial line... | 
|
... and the DLMS/COSEM protocol.
The problem is not trivial, and to be able to design a solution, we first need to know more about some of the main concepts of the COSEM/DLMS standard.
The Physical Device
The Physical device, is our meter, it supports one or more communication profiles. Currently, the Standard specifies two profiles: the 3-layer, connection oriented HDLC-based profile, and the TCP-UDP/IP based profile. Our device, like many others, uses the HDLC-based profile, it also has a physical address.
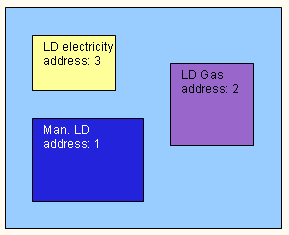
The Logical Device
A physical device hosts one or several Logical Devices. A logical device models a specific functionality of the physical device. For example, in a multi-energy meter, one logical device could be an electricity meter, another, a gas-meter etc. Each logical device has an address, called the logical device address.
According to the Standard, all physical devices have to host a special logical device called the management logical device, with the predefined address 1. The management logical device itself may contain a lot of information, but, at the minimum, it has to contain a description of all the logical devices available in the physical meter, with their logical addresses and names.
So, how do we read the value of the active energy out of the logical devices?
The COSEM Classes and object instances
A logical device is a container for COSEM objects. A COSEM object is simply a structured piece of information with attributes and methods. For the moment, we will ignore the methods and just focus on the attributes since they contain the values that we are interested in. All objects that share the same structure are of the same COSEM class. There are many COSEM classes (about 50) because there are many different objects kinds. Since a logical device may contain many objects of different classes, then how do we identify the information that we are interested in? This is possible because, by definition, the first attribute of each object is its Logical Name.
The Logical Name
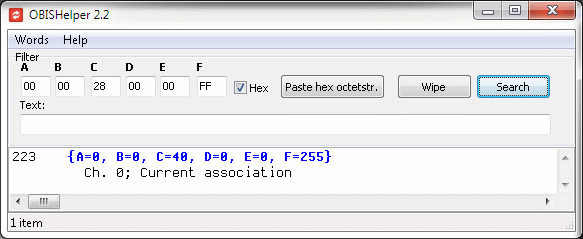
A logical name consists of a string of 6 values defined according to a system called OBIS for Object Identification System. OBIS allows to uniquely identify each of the many data items used in the energy metering equipment. The list of all possible OBIS codes (OBIS code is another name for logical name) is published by the DLMS Users Association on their web site in a dense Excel document. Fortunately, we have a simple tool, called OBISHelper, able to find and identify the OBIS codes in a more comfortable way. Then, what is the logical name of the active energy ''object''?
Using OBISHelper, we search for codes with ''active power'' and ''time integral'':
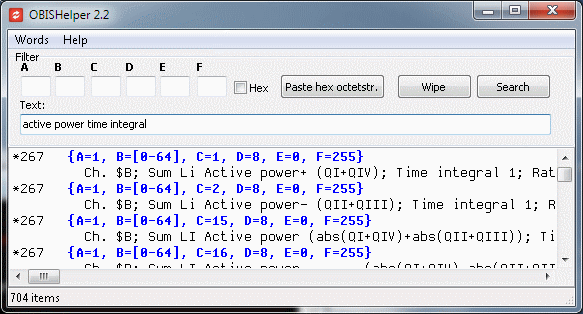
It appears that the required OBIS code should be (in the standard notation) 1.x.1.8.0.255, for example 1.1.1.8.0.255. How can we know if such an object exists in our electricity-meter?
The Association object
Each logical device contains at least one object of class Association LN or Association SN. We will come back later to these strange names. For the moment it suffices to say that the association object has an attribute (attribute 2) called the object list containing the list of all objects available in the logical device. Furthermore, the association object has the predefined logical name 0.0.40.0.0.255. Therefore, we can find out what objects are available in a logical device just by reading its object list.
The mandatory elements of devices
To summarize: several mandatory elements allow us to get the necessary information about the content of a physical device:
- Each physical device has a management logical device, at address 1.
- A management logical device hosts a list of all the available logical devices in the physical device. This list is the second attribute of the object of class SAP Assignment , with the predefined name 0.0.41.0.0.255. Each list item consists of the name and the address of a logical device.
- Each logical device hosts a list of all its available objects. This list is the second attribute of the object of class Association, with the predefined name 0.0.40.0.0.255. Each list item consists (among others) of the logical name and the class of an object.
So finally, how do we read the active energy register?
The Client-Server model
The data exchange between our program and the meter uses the client-server model. Our application is the client and the meter plays the role of server. The client sends requests and the server answers responses. For example, our application would send something like ''read the object 1.0.1.8.0.255'' and the server would answer ''1789.8 kWh''. Still, before being able to send such requests, the client has first to establish a connection with the other side. But, as we have seen, the other side is not just a physical device but a collection of logical devices, therefore an addressing system is needed.
The addressing
In the COSEM/DLMS communication framework, each side of the connection has an address. By definition, the client address is a byte value. Furthermore, the value of the client address determines also the real nature of the client. The Standard states that a client with address 16 (decimal) is a public client. There can be other kind of clients, for example a Data Collection System, a Manufacturer, a Consumer, though, the addresses of those clients are not defined in the Standard.
The server address is the doublet:
{
address of the logical device,
address of the physical device
}.
The Access Rights
Of course, not everybody is allowed to read or write any value in a meter. There are several mechanisms to control the access rights. The simplest one is based on the following rule: your access rights depend on who you are. The meter knows you by your client address and, according to that address, it will present you (via the Association object) just the objects that you are allowed to read (or write). If you are not a public client, then, you will have more privileges, but you will also have to provide somewhere a password or even more complex security elements (see also High Level Security using GMAC). Nevertheless, a public client is always authorized to access the logical management device. Some manufacturers allow public clients to read many objects, others are far more restrictive. In some cases, if you don't have the required credentials, you will not even be authorized to read the active energy!
Connecting the layers
We assume that our meter implements the 3-layer, connection-oriented, HDLC-based profile. According to the Open Systems Interconnection (OSI) model, each of client's layer exchanges data with the peer server's layer. The 3 layers of the HDLC profile are the Physical layer, the HDLC layer and the Application layer.
The physical layer
The lowest layer is the physical layer, it is the layer 1 in the OSI model. In our practical example, it boils down to a simple (3-wires) serial cable between a COM port of our PC and the appropriate connector of our meter. The connection between the two peers layers is accomplished...by mechanically connecting the two sides.

From here...
|
...
|
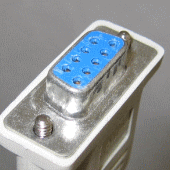
...
|
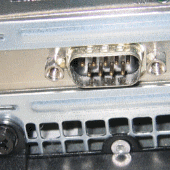
...to there.
|
The HDLC layer
The next layer is the HDLC layer, it corresponds to the layers 2 to 4 of the OSI model. The HDLC layer is connection oriented. It means that the peer HDLC layers must first build a logical connection with each other by exchanging and negotiating some connection parameters. Then, they can exchange data, as long as needed and finally they close the connection. The data elements exchanged by the HDLC peer layers are called HDLC-frames.
The whole ''two ways alternate'' HDLC layer traffic is rather complex: the HDLC layer is able to segment long data into information frames (I-Frame) and reassemble information frames into long data, it verifies the sequencing of frames, it checks the frames integrity using CRCs, it monitors various timeouts. We will not go into the details of the HDLC exchanges. Instead, in our target program, we will use our ezhdlc library, that implements the whole HDLC traffic and just exposes three routines:
HDLCConnect();
Establishes an HDLC connection with the peer layer.
HDLCSendReceive(DataToSend, DataReceived);
Sends data to the peer layer and receives the response from the peer layer.
HDLCDisconnect();
Closes the connection.
There are several parameters to set before calling the HDLC routines, the most important are the HDLC-addresses (also called MAC addresses). The client MAC address is a byte value, it identifies the client. We will use 16 (decimal) which means public client.
The server (or meter) MAC address is divided in two parts, the upper part is the logical device address, and the lower part is the physical device address. In some cases, the lower part can be omitted. For example, in a point-to-point configuration with a single meter, we don't care about the physical address of the meter. Note, however, that this feature is not implemented by all manufacturers.
To summarize: on the HDLC layer, the client address is always a byte, the server address consists of two parts and there are three variants:
- One byte addressing. There is just an upper address. It is a byte value.
- Two bytes addressing. There is an upper address on 1 byte and a lower address on 1 byte.
- Four bytes addressing. There is an upper address on 2 bytes and a lower address on two bytes.
Note that not all manufacturers support the three variants.
Here is an example of the HDLC-layer parameters as set in the EZReader application:

EZReader parameters, One byte
addressing
|
We set 16
for the client address (it is the public client,
which is always available) and 1 for the server
address (this is the management logical device, which is
always available). The Physical address (lower address) is not specified because the meter uses one byte addressing. |
In EZReader when we click ''Connect'', the library routine HDLCConnect sends a SNRM-frame to the server. The server responds with an UA-frame. The next picture shows the resulting frame exchange. The green frame is the SNRM-frame and the red is the UA-frame:

This frame exchange establishes the HDLC layer connection. From now on, data frames (I-Frame) can be exchanged between the two sides.
The Application layer
The last layer of the 3-layers profile is the Application layer. After having connected the physical layer and the HDLC layer, we have to connect the Application layer. In the OSI terminology, this kind of connection is called an Association. Therefore, to establish an association, we send an Association request and we expect an Association response. Then, if the association has been correctly established, we continue to send requests and receive responses until we are finished. Finally, we release the association by disconnecting the HDLC-Layer.
All the requests and their corresponding responses are defined in the Standard using the ASN.1 notation. However, in our tools and libraries, the specific instances of requests and responses are presented in a XML notation, like in the following:
<ReadRequest Qty="0001" >
<ParameterisedAccess>
<VariableName Value="60E8" />
<Selector Value="01" />
<Parameter>
<Structure Qty="0004" >
<Structure Qty="0004" >
<LongUnsigned Value="0008" />
<OctetString Value="0000010000FF" />
<Integer Value="02" />
<LongUnsigned Value="0000" />
</Structure>
<OctetString Value="07D8021DFF0C130DFF8000FF" />
<OctetString Value="07D90A1DFF0B3622FF8000FF" />
<Array Qty="0000" >
</Array>
</Structure>
</Parameter>
</ParameterisedAccess>
</ReadRequest>
This is a ReadRequest element. How can we send such a request to the meter? Of course, the XML lines cannot be sent directly. They must be first encoded into a byte sequence known as a protocol data unit (PDU), according to the rules specified in the Standard. We will not go into the details of the encoding. Instead, in our target program, we will use our xmlpdu library, that implements the encoding and decoding procedures. The library exposes two routines:
XmlToPdu(XmlLines, Pdu);
Encodes a sequence of XML lines into a PDU
PduToXml(Pdu, XmlLines);
Decodes the PDU into a sequence of XML lines.
For example, the encoded PDU of the above ReadRequest is this bytes sequence...
05 01 04 60 E8 01 02 04 02 04 12 00 08 09 06 00 00 01 00 00 FF 0F 02 12 00 00 09 0C 07 D8 02 1D FF 0C 13 0D FF 80 00 FF 09 0C 07 D9 0A 1D FF 0B 36 22 FF 80 00 FF 01 00
...that we send to the meter using the HDLC layer, by calling HDLCSendReceive() and pass the bytes sequence as parameter. Then, when the meter responds with another bytes sequence, we translate it back to XML with PduToXml(). Finally, we parse the received XML using any appropriate method. To summarize: all request/response exchanges follow these five steps:
- Have the XML of a request.
- Encode the XML to PDU using XmlToPdu().
- Send the PDU to the other side and get a response PDU, using HDLCSendReceive().
- Decode the response PDU into XML with PduToXml().
- Finally, parse the XML of the response.
To come back to the problem: what requests will we have to send and what responses will we expect, if we want to read the energy register?
The AssociationRequest
The AssociationRequest is the first request that we have to send in order to establish the Association. It looks like this:
<AssociationRequest>
<ApplicationContextName Value="SN" />
<InitiateRequest>
<ProposedDlmsVersionNumber Value="06" />
<ProposedConformance>
<ConformanceBit Name="ParametrizedAccess" />
<ConformanceBit Name="MultipleReferences" />
<ConformanceBit Name="Write" />
<ConformanceBit Name="Read" />
</ProposedConformance>
<ProposedMaxPduSize Value="FFFF" />
</InitiateRequest>
</AssociationRequest>
The application context name
The exchanges with the meter can take place in two flavors called ''contexts'', that differ in the way the data is addressed (or referenced). In the logical name reference context (or LN) the data is referenced by the logical name (OBIS code). In the short name reference context (or SN) the data is referenced (addressed) by a unique 16 bit integer. Furthermore, the services used to access the data are different in each context. In LN context, the relevant services are Get (to read data) and Set (to write data) and in SN context the services are Read and Write. The context cannot be freely chosen by the client. Rather, it is fixed by the meter's manufacturer, it is a characteristic of its implementation. Therefore, the meter's context must be known beforehand.
The Proposed Dlms Version Number
This value is currently fixed to 6, it is the version number of the DLMS protocol.
The Proposed Conformance
This is a list of capabilities that we are expecting the meter to have. In our example, since we are in SN context, we are expecting the following capabilities:
- Read : to support the read service.
- Write: to support the write service.
- MultipleReferences: to be able to handle several reads (or writes) at once.
- ParametrizedAccess: to allow to read subsets of large attributes.
For a LN meter we would have used this kind of AssociationRequest:
<AssociationRequest>
<ApplicationContextName Value="LN" />
<InitiateRequest>
<ProposedDlmsVersionNumber Value="06" />
<ProposedConformance>
<ConformanceBit Name="Action" />
<ConformanceBit Name="EventNotification" />
<ConformanceBit Name="SelectiveAccess" />
<ConformanceBit Name="Set" />
<ConformanceBit Name="Get" />
<ConformanceBit Name="BlockTransferWithAction" />
<ConformanceBit Name="BlockTransferWithSet" />
<ConformanceBit Name="BlockTransferWithGet" />
<ConformanceBit Name="Attribute0SupportedWithGet" />
<ConformanceBit Name="PriorityMgmtSupported" />
<ConformanceBit Name="Attribute0SupportedWithSet" />
</ProposedConformance>
<ProposedMaxPduSize Value="FFFF" />
</InitiateRequest>
</AssociationRequest>
As a LN meter supports different service than a SN meter, then the requested capabilities are different. Otherwise the two requests are the same.
The Proposed MaxPdu Size
is the size of the longest PDU that the client is able to store. The value "FFFF" means "no limits".
The AssociationResponse
The meter's response to an AssociationRequest is an AssociationResponse. For example, a SN meter would send this response:
<AssociationResponse>
<ApplicationContextName Value="SN" />
<AssociationResult Value="00" />
<ResultSourceDiagnostic>
<AcseServiceUser Value="00" />
</ResultSourceDiagnostic>
<InitiateResponse>
<NegotiatedDlmsVersionNumber Value="06" />
<NegotiatedConformance>
<ConformanceBit Name="ParametrizedAccess" />
<ConformanceBit Name="MultipleReferences" />
<ConformanceBit Name="Write" />
<ConformanceBit Name="Read" />
</NegotiatedConformance>
<NegotiatedMaxPduSize Value="0960" />
<VaaName Value="FA00" />
</InitiateResponse>
</AssociationResponse>
The Association Result
A value of zero indicates that the request succeeded. Any other value indicates a failure.
The Negotiated Conformance
The negotiated conformance is a list of capabilities that the meter implements. It contains all the capabilities that we have requested in the negotiated conformance of the AssociationRequest except the capabilities which are NOT supported by the meter.
The Negotiated MaxPdu Size
is the size of the longest PDU that the meter is able to store. A client should never send a PDU longer than this value.
The VaaName
is the short name of the (current) association object. We will ignore it.
If the association fails, then the response will look like this:
<AssociationResponse>
<ApplicationContextName Value="LN" />
<AssociationResult Value="01" />
<ResultSourceDiagnostic>
<AcseServiceUser Value="0B" />
</ResultSourceDiagnostic>
<InitiateResponse>
<NegotiatedDlmsVersionNumber Value="06" />
<NegotiatedConformance>
<ConformanceBit Name="Action" />
<ConformanceBit Name="SelectiveAccess" />
<ConformanceBit Name="Set" />
<ConformanceBit Name="Get" />
<ConformanceBit Name="BlockTransferWithGet" />
<ConformanceBit Name="Attribute0SupportedWithGet" />
</NegotiatedConformance>
<NegotiatedMaxPduSize Value="2134" />
<VaaName Value="0007" />
</InitiateResponse>
</AssociationResponse>
The association result is not null. The value of the AcseServiceUser element is an error code.
How to read data from a SN meter
The service used to read data from a short name referencing meter is the ReadRequest. This is a very simple service. Here is an example:
<ReadRequest Qty="0001" >
<VariableName Value="2BC8" />
</ReadRequest>
A ReadRequest allows to read several attributes at once, still, in the example, we just want to read one single attribute, therefore "Qty" is set to 1. The (short name) reference of the attribute we want to read is the value of the element "VariableName". Our goal is to read the value of the object with logical name 1.1.1.8.0.255, then, how do we know the relationship (mapping) between the logical names and the short names?
The mapping between SN and LN
The mapping information between the short names and the logical names is directly available from the meter itself, it is called the Object List and it is also the second attribute of the (current) Association object. In fact, the object list doesn't really contain the short name of all attributes but rather one single base name for each object instance. But what is then the base name of the Association object itself? Fortunately, this name is defined as ''FA00''.
From the base name to the short name
By definition, the base name of an object instance is also the short name of its first attribute. Then, for example, the following request...
<ReadRequest Qty="0001" >
<VariableName Value="FA00" />
</ReadRequest>
...causes this response:
<ReadResponse Qty="0001" >
<Data>
<OctetString Value="0000280000FF" />
</Data>
</ReadResponse>
By definition, the first attribute (attribute 1) of any object instance is its logical name. Therefore, the responded OctetString is simply the logical name of the current Association:
What are the short names of the other attributes? By definition, the short name of attribute N is given by:
ShortNameOfAttributeN = BaseName + 8 * (N-1)
According to the standard, the object list is the attribute 2 of the current association. Therefore its short name is FA00 + 8 = FA08. Let's read the object list:
<ReadRequest Qty="0001" >
<VariableName Value="FA08" />
</ReadRequest>
Here is the response:
<ReadResponse Qty="0001" >
<Data>
<Array Qty="00F0" >
<Structure Qty="0004" >
<Long Value="00C8" />
<LongUnsigned Value="2716" />
<Unsigned Value="00" />
<OctetString Value="0000F00D00FF" />
</Structure>
....
<Structure
Qty="0004" >
<Long
Value="1770" />
<LongUnsigned
Value="0003" />
<Unsigned
Value="00" />
<OctetString
Value="0101010800FF" />
</Structure>
....
</Array>
</Data>
</ReadResponse>
The object list is an array of 240 (F0) entries. Each entry describes one object instance using a structure of 4 elements. Let's consider the item in blue:
- The first element is the base name of the object instance: "1770"
- The second element is the class identifier of the object instance. There are many classes in COSEM. Class 3 is the Register Class.
- The third element is the class version of the class of the object instance, here it is version 0.
- Finally, the fourth element is the logical name of the object instance: "0101010800FF"
Thanks to the object list, we know that the active energy (OBIS 1.1.1.8.0.255) is an object instance of class 3 with a base name of 1770. The COSEM/DLMS Blue Book shows us that the layout of the Register Class is:
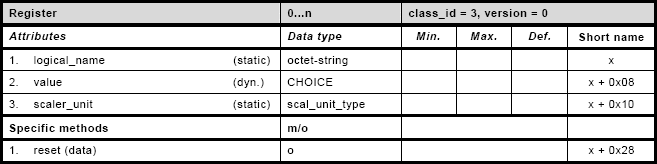
This tells us that the value attribute is attribute 2, therefore the short name of the active energy value is 1770 + 8 = 1778. Let's read the value:
<ReadRequest Qty="0001" >
<VariableName Value="1778" />
</ReadRequest>
<ReadResponse Qty="0001" >
<Data>
<Long64 Value="000000000000017D" />
</Data>
</ReadResponse>
The response gives the ''digits'' of value of the active energy,17D (hexa) or 381 (dec), but we still don't have the ''real'' value. We also need to read the third attribute (scaler_unit):
<ReadRequest Qty="0001" >
<VariableName Value="1780" />
</ReadRequest>
<ReadResponse Qty="0001" >
<Data>
<Structure Qty="0002" >
<Integer Value="FF" />
<Enum Value="1E" />
</Structure>
</Data>
</ReadResponse>
The scaler-unit is a structure of two elements. The first element is an integer power of 10 (scaler). The second element gives the measuring unit. Therefore, scaler = -1, unit = 1E = Wh (according to the Blue Book). Finally, we have it: the value of the active energy is:
ActiveEnergy = 381 * 10-1 = 38.1 Wh = 0.0381kWh
Since our meter supports ''MultipleReferences'', we can also read the attributes 2 and 3 at once:
<ReadRequest Qty="0002" >
<VariableName Value="1778" />
<VariableName Value="1780" />
</ReadRequest>
<ReadResponse Qty="0002" >
<Data>
<Long64 Value="000000000000017D" />
</Data>
<Data>
<Structure Qty="0002" >
<Integer Value="FF" />
<Enum Value="1E" />
</Structure>
</Data>
</ReadResponse>
How to read data from a LN meter
In logical name referencing, we use the Get service to read the data. There are several variants of GetRequest, the simplest is the GetRequestNormal. Here it is:
<GetRequest>
<GetRequestNormal>
<InvokeIdAndPriority Value="C1" />
<AttributeDescriptor>
<ClassId Value="0003" />
<InstanceId Value="0101010800FF" />
<AttributeId Value="02" />
</AttributeDescriptor>
</GetRequestNormal>
</GetRequest>
InvokeIdAndPriority
is a byte value. The bit 7 selects the priority, 1 means high priority. The bit 6 selects the service class and will be set to 1. The remaining bits are an unsigned value identifying this particular invocation of GetRequestNormal. In our examples, we will always set InvokeIdAndPriority to "C1".
AttributeDescriptor
This 3 elements structure identifies the object instance and the attribute that we want to read:
- ClassId is the class identifier of the object that hosts the attribute we want to read.
- InstanceId is the logical name of that object read.
- AttributeId is the attribute number of the attribute we want to read.
The AttributeId can be found in the Blue Book. The ClassId and the InstanceId can be found in the object list. According to the Blue Book, the object list is the attribute 2 of the object 0.0.40.0.0.255, and, the ClassId is 15 (Association LN). Therefore, the GetRequestNormal to read the object list looks like this:
<GetRequest>
<GetRequestNormal>
<InvokeIdAndPriority Value="C1" />
<AttributeDescriptor>
<ClassId Value="000F" />
<InstanceId Value="0000280000FF" />
<AttributeId Value="02" />
</AttributeDescriptor>
</GetRequestNormal>
</GetRequest>
The response can be a GetResponseNormal, as here:
<GetResponse>
<GetResponsenormal>
<InvokeIdAndPriority Value="C1" />
<Result>
<Data>
<Array Qty="0002" >
<Structure
Qty="0004" >
<LongUnsigned
Value="0001" />
<Unsigned
Value="00" />
<OctetString
Value="00002A0000FF" />
<Structure
Qty="0002" >
<Array
Qty="0002" >
<Structure
Qty="0003" >
<Integer
Value="01" />
<Enum
Value="01" />
<NullData />
</Structure>
<Structure
Qty="0003" >
<Integer
Value="02" />
<Enum
Value="01" />
<NullData />
</Structure>
</Array>
<Array
Qty="0000" >
</Array>
</Structure>
</Structure>
....
</Array>
</Data>
</Result>
</GetResponsenormal>
</GetResponse>
This object list is very small. It has only two entries. Each entry describes one object instance using a structure of 4 elements. However, when the meter has many objects, a GetResponseNormal would result in a very long PDU. Therefore, provided that the meter has the capability BlockTransferWithGet (which is listed in the NegotiatedConformance of the AssociationResponse), it will send the data in several blocks rather than in one large single chunk. This feature is called ''block transfer'', it is indeed a data segmentation mechanism supported in the application layer and we have to handle it in details.
LN Block Transfer
When a LN meter receives a GetRequestNormal (for example to read the object list) it may decide to respond with a GetResponseNormal or it may rather switch to block transfer and respond with a GetResponseWithDataBlock. In that case the response will be:
<GetResponse>
<GetResponsewithDataBlock>
<InvokeIdAndPriority Value="C1" />
<Result>
<LastBlock Value="00" />
<BlockNumber Value="00000001" />
<Result>
<RawData Value="018201B3020412...6020002031601000100" />
</Result>
</Result>
</GetResponsewithDataBlock>
</GetResponse>
The element InvokeIdAndPriority is the same as in the request. The outer Result is a structure of 3 elements:
- LastBlock is a boolean which indicates if this block is the last block of the block transfer (00 = false).
- BlockNumber is an unsigned value and is the number of this block.
- Finally, the RawData (in the inner Result) is an octet string containing the first n bytes of our data.
Having the first block, we save the RawData, say T, and ask for the next block using GetRequestForNextDataBlock:
<GetRequest>
<GetRequestForNextDataBlock>
<InvokeIdAndPriority Value="C1" />
<BlockNumber Value="00000001" />
</GetRequestForNextDataBlock>
</GetRequest>
InvokeIdAndPriority stays the same. BlockNumber is the number of the last block that we have received. The response to this request will be another GetResponseWithDataBlock (BlockNumber 2) and we will right-concatenate its RawData to the T:
T := T + RawData
Then, we will repeat the process until we have received the last block (LastBlock = true):
<GetResponse>
<GetResponsewithDataBlock>
<InvokeIdAndPriority Value="81" />
<Result>
<LastBlock Value="01" />
<BlockNumber Value="00000006" />
<Result>
<RawData Value="02041200071...601000100" />
</Result>
</Result>
</GetResponsewithDataBlock>
</GetResponse>
Here again, we right-concatenate the RawData to the data received so far.
T := T + RawData
The final data T will be a very long PDU. To convert T to XML we left-concatenate it with the byte FF:
T := FF + T
and pass it to PduToXml.
The resulting XML will look like this:
<Data>
<Array Qty="01B3" >
....
<Structure
Qty="0004" >
<LongUnsigned
Value="0003" />
<Unsigned
Value="00" />
<OctetString
Value="0101010800FF" />
<Structure
Qty="0002" >
<Array
Qty="0003" >
<Structure
Qty="0003" >
<Integer
Value="01" />
<Enum
Value="01" />
<NullData />
</Structure>
<Structure
Qty="0003" >
<Integer
Value="02" />
<Enum
Value="01" />
<NullData />
</Structure>
<Structure
Qty="0003" >
<Integer
Value="03" />
<Enum
Value="01" />
<NullData />
</Structure>
</Array>
<Array
Qty="0000" >
</Array>
</Structure>
</Structure>
....
</Array>
</Data>
The resulting data is an array with (possibly) many elements. There is one array entry for each object instance. Each entry is a structure of 4 elements:
- The first element (LongUnsigned) is the ClassId of the instance.
- The second element (Unsigned) is the version number of the class of the instance.
- The third element is the logical name of the instance.
- Finally, the fourth element lists the access rights of the attributes and methods of the instance.
Finally, as we know the parameters, we can send a GetRequestNormal to read the ''digits'' of the energy register:
<GetRequest>
<GetRequestNormal>
<InvokeIdAndPriority Value="C1" />
<AttributeDescriptor>
<ClassId Value="0003" />
<InstanceId Value="0101010800FF" />
<AttributeId Value="02" />
</AttributeDescriptor>
</GetRequestNormal>
</GetRequest>
Here is the response:
<GetResponse>
<GetResponsenormal>
<InvokeIdAndPriority Value="C1" />
<Result>
<Data>
<DoubleLongUnsigned Value="000007D3" />
</Data>
</Result>
</GetResponsenormal>
</GetResponse>
We read the scaler with this request:
<GetRequest>
<GetRequestNormal>
<InvokeIdAndPriority Value="C1" />
<AttributeDescriptor>
<ClassId Value="0003" />
<InstanceId Value="0101010800FF" />
<AttributeId Value="03" />
</AttributeDescriptor>
</GetRequestNormal>
</GetRequest>
And the response is:
<GetResponse>
<GetResponsenormal>
<InvokeIdAndPriority Value="C1" />
<Result>
<Data>
<Structure Qty="0002" >
<Integer Value="FE" />
<Enum Value="1E" />
</Structure>
</Data>
</Result>
</GetResponsenormal>
</GetResponse>
Finally the active energy is:
ActiveEnergy = 2003 * 10-2 = 20.03 Wh = 0.02003kWh